Matlab Frequently Asked Questions!
Consider the following
» a1 = [1 4 5 7];
» a2 = [2 4 3 4];
Now if you wanted to multiply the two arrays above element for element then that would be considered array division. So if you try the following
» a1*a2;
??? Error using ==> *
Inner matrix dimensions must agree.
What has happened is Matlab tried to do MATRIX MULTIPLICATION. Not element by element array multiplication. So we should us the DOT '.' operator.
» a1.*a2
ans =
2 16 15 28
same thing for division.
» a1./a2
ans =
0.5000 1.0000 1.6667 1.7500
The dot operator will be required at many places since most Matlab programs do not require actual matrix manipulations but just array manipulations.
Addition and subtraction will not work with DOT operator.
» a1 + a2
ans =
3 8 8 11
» a1 .+ a2
??? a1 .
|
Missing operator, comma, or semi-colon
Now suppose you want to "square" the matrix, i.e. raise the power to 2. Again the dot operator has to employed.
» a1^2
??? Error using ==> ^
Matrix must be square.
» a1.^2
ans =
1 16 25 49
We can use either size() or length().
» b1 = [1 3 5 7 9]
b1 =
1 3 5 7 9
» b2 = [2 3 5 6; 1 2 9 8]
b2 =
2 3 5 6
1 2 9 8
» length(b1)
ans =
5
» size(b1)
ans =
1 5
» length(b2)
ans =
4
» size(b2)
ans =
2 4
Length gives the length of the larger dimension, while size always returns both the dimensions. These values can be used suitably.
The colon operator is a very important operator and can at many times help to avoid using for loops or other such constructs.
For example suppose we had a 2-d matrix/array.
» c1 = [1 2 3 4; 2 4 7 9]
c1 =
1 2 3 4
2 4 7 9
and now we want to split this up in two different arrays. Or want to rearrange the bottom half of the matrix at the side of the top half.
So first of all we need to know dimensions of the array/matrix
» dimen = size(c1)
dimen =
2 4
» nrow = dimen(1)
nrow =
2
» ncol = dimen(2)
ncol =
4
Ofcourse we could just read the number of rows and columns off the matrix itself. However for much larger matrices it becomes a problem. The above commands help us make it a generic algorithm.
Now we will try an remove 'x' number of rows from the matrix c1. Suppose for simplicity that we want exactly half the rows of the matrix in another matrix.
» c2 = c1(1:(nrow/2),:)
c2 =
1 2 3 4
Here "1:(nrow/2)" specifies the row and ":" specifies the column. The comma separates the two parameters. To specify rows(or columns) we need to use the colon operator. 1:2 would mean go from the first row(or column) and stop when you reach the second. Thus 1:(nrow/2) would take all rows from 1 to nrow/2 which happens to be for this case 1.
So what is the deal with just a colon for the columns. That means ALL columns. Thus the above command would take half the rows and all the columns. Similarly we can take the remaining rows too.
» c3 = c1(((nrow/2) + 1):nrow,:)
c3 =
2 4 7 9
Now we could use these two broken matrices and rearrange them.
» c4 = [c2 c3]
c4 =
1 2 3 4 2 4 7 9
This puts the two matrices side by side. Remember when there are more than two rows, it will actually put a lot of rows next to a lot of rows. We could also put the bottom half on the top.
» c5 = [c3; c2]
c5 =
2 4 7 9
1 2 3 4
Another thing that could be done with colon operators is set up an array without a for loop. For e.g.
» c6 = 1:5
c6 =
1 2 3 4 5
This sets up c6 to go from 1 to 5. The default increment value is 1. To change it we can do
» c7 = 1:0.5:5
c7 =
Columns 1 through 7
1.0000 1.5000 2.0000 2.5000 3.0000 3.5000 4.0000
Columns 8 through 9
4.5000 5.0000
Thus the step increment was changed to 0.5. The increments can be negative if the start value is greater than the stop value.
An easy way to initialize arrays is using the following commands.
» d1 = zeros(3)
d1 =
0 0 0
0 0 0
0 0 0
But I just wanted a single array. Ok try this.
» d2 = zeros(1, 3)
d2 =
0 0 0
» d3 = zeros(3, 1)
d3 =
0
0
0
Arrays can also be initialed to 1. Simply change zeros in all above commands to ones
Suppose you have a file test.txt, whose contents are as follows
frequency.
amplitude.
s11, s21, s12, s22
Network analyzer data.
10, 11
12, 13
14, 15
16, 17
18, 19
20, 21
data ends here
Now suppose, you want to just take the numbers from the file to Matlab and want to get rid of the header, footer etc. Then you should open the above file in a text editor, and delete all the header lines. And assign the numbers to a variable say e1. After these changes the file will look as follows:
e1 = [
10, 11
12, 13
14, 15
16, 17
18, 19
20, 21
];
Thus everything has been assigned to the variable e1. Now save this file as "e1.m". Now movw this file to the directory which Matlab is currently working in. By default this directory is ../Matlab/bin/ , However it may be different if you have changed directories. Now at the command prompt type "e1".
» e1
Nothing is displayed on the screen (because in the file we used ";" and that is very useful when we have long arrays), however a variable e1 has been created and has the data we require. If you want to see the data you could do the following:
» e1
e1 =
10 11
12 13
14 15
16 17
18 19
20 21
And now you could separate the two columns (discussed in detail in a question above) using :
» e2 = e1(:,1:1)
e2 =
10
12
14
16
18
20
» e3 = e1(:,2:2)
e3 =
11
13
15
17
19
21
In Matlab numbers can be truncated using fix() and rounded using round().
» fix(5.6)
ans =
5
» round(5.6)
ans =
6
Matlab seems to have some problem plotting color plots. There are some parameters which need to be set which at the time of writing were unavailable to the author. However there are some ways around this.
To be sure that the background is right. You can click on the Matlab figure window, File>Preferences….
And then chose Copying Options Tab. Here select "white background" and either "windows metafile" or "windows bitmap" deselect everything else.
Now, in the figure window you can click Edit> Copy Figure. This will put the plot in color on the clipboard. Now you can open Paint or Word and do Edit> Paste. And get the picture in that application and then print. This works fine and gives color. Ofcourse, one needs a color printer for this to work :)
If however no color printer is available or you just want to save on money, use the plot() function to give different line formats. Here v is some arbitrary data
» plot(v) % standard solid line
» plot(v, '-') % standard solid line
» plot(v, ':') % dashed line
» plot(v, '-.') % dash-dot line
» plot(v, '--') % long dash line
You can also add color by putting the color parameter
» plot(v, '-r') % standard solid line red
» plot(v, '-b') % standard solid line blue
» plot(v, '-k') % standard solid line black
» plot(v, '--m') % long dash line magenta
There are other colors possible. For more detail use "help plot" at the command line. Using a combination of these color and line styles many distinguishable plots can be drawn on the same figure.
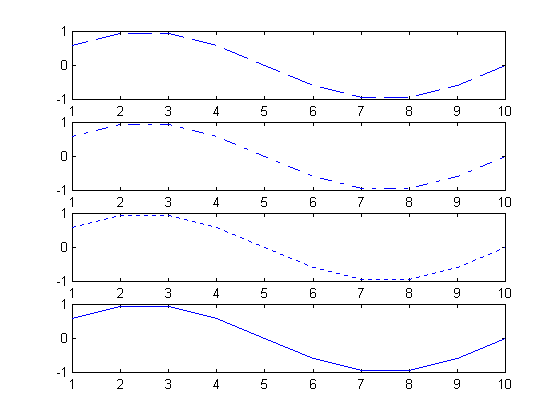
Using subplot, you can plot multiple figures on the same page. Subplot has three parameters, The first is number of rows, second is number of columns, third is which plot in the figure. Have a look at the sample commands below. A subplot command makes that subplot area ready for you. It DOES NOT PLOT figures for you. Hence after each subplot you have to use plot.
» subplot(4,1,1)
» plot(v, '--')
» subplot(4,1,2)
» plot(v, '-.')
» subplot(4,1,3)
» plot(v, ':')
» subplot(4,1,4)
» plot(v, '-')
The above lines gave the following figure. As can be seen from the commands, number of rows is 4 and
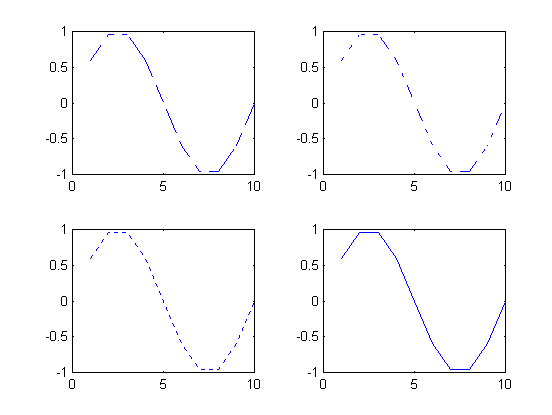
Number of columns is 1. We could have also plotted these 4 plots in the following way.
» subplot(2,2,1)
» plot(v, '--')
» subplot(2,2,2)
» plot(v, '-.')
» subplot(2,2,3)
» plot(v, ':')
» subplot(2,2,4)
» plot(v, '-')
Here we see there are 2 rows and 2 columns and we can distribute the plots.
If there are any other queries on Matlab please email Nilesh Kamdar (
SL45Z@cc.usu.edu)